In the world of business, efficiency is king. Traditionally, apps like Google Sheets, CRM systems, and notification tools live in silos, requiring manual work or expensive developers to bridge the gaps. n8n acts as a “universal translator,” allowing these apps to communicate seamlessly [02:20].
In this GenAI Unplugged guide, we build a robust, multi-app workflow to automate lead management—saving you hours of manual data entry and evaluation [02:46].
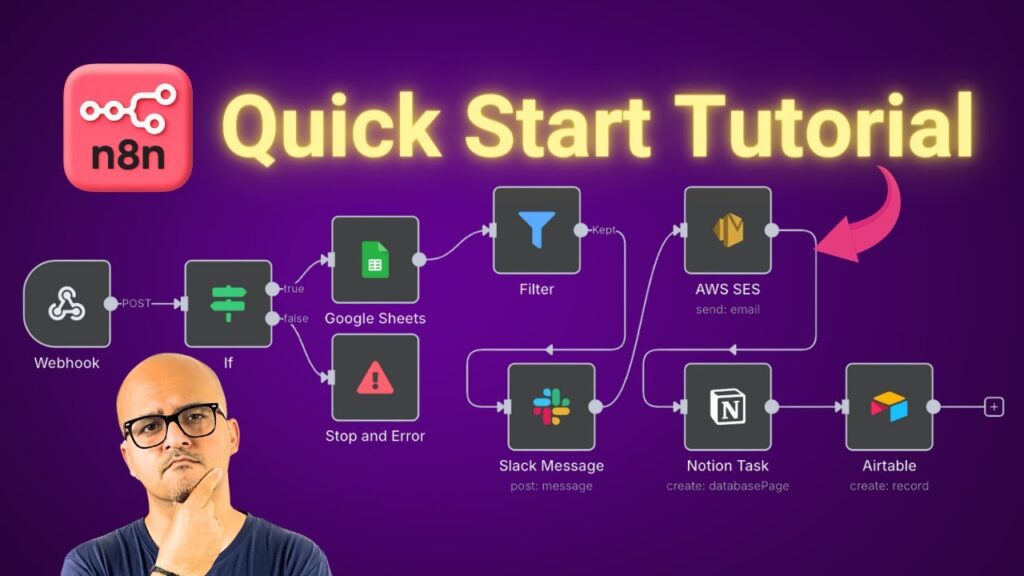
The Workflow: From Survey to Sale
The objective of this workflow is to capture survey responses and route them through a series of automated actions based on whether a lead is “qualified” [03:32].
Step 1: Capturing the Lead (Webhooks & Google Forms)
Every workflow starts with a Trigger. We use a Webhook Node to listen for submissions from a Google Form [04:41].
- Pro-Tip: Using Google Apps Script, you can bridge the gap between Google Forms and n8n so that data is “pushed” to your workflow the moment a user hits submit [05:50].
Step 2: Centralizing Data (Google Sheets)
Once the data is received, the first action is to Append a Row to a master Google Sheet. This ensures a “single source of truth” for every survey response ever collected [09:17].
Step 3: Qualification Logic (The If Node)
Not every lead is a good lead. We add an If Node to evaluate the data automatically [12:43]:
- Qualification Rule: If the “Company Name” is not empty AND the email doesn’t end in
@gmail.comor@hotmail.com, the lead is marked as qualified [12:53].
Integrating the “Power Apps”: Notion & Airtable
Step 4A: Real-Time Alerts (Slack)
For every qualified lead, a Slack notification is sent to the sales team instantly. The message includes the lead’s name and contact info so the team can react while the lead is “warm” [14:38].
Step 4B: Task Management (Notion)
Next, we integrate Notion to create a task for the sales team.
- The Setup: We use an Internal Integration Token to connect n8n to a specific Notion workspace [17:30].
- The Action: n8n creates a “Database Page” in your Notion Task Tracker, complete with custom properties like “Priority” and “Lead Description” [21:54].
Step 4C: CRM Entry (Airtable)
Finally, the lead is added to Airtable, acting as our CRM.
- The Setup: We demonstrate two ways to connect Airtable: Personal Access Tokens (PAT) and OAuth2 [26:19].
- The Action: A new record is created in the “Customers” table, mapping the first name, last name, and email directly from the form [33:07].
Summary of the Automation [34:53]
Without writing a single line of code, we’ve created a system that:
- Listens for a form submission.
- Records the data in Google Sheets.
- Evaluates the lead quality.
- Notifies the team on Slack.
- Assigns a task in Notion.
- Registers the customer in the Airtable CRM.
This is the power of n8n: taking a complex, manual business process and turning it into a 24/7 automated machine.
Watch the full tutorial here: n8n Quick Start Workflow | Airtable, Notion, Slack & Amazon SES